Kubectl 常用命令备忘

Kubectl 常用命令备忘

1、Kubectl 自动补全

  • BASH

    1
    2
    source <(kubectl completion bash) # 在 bash 中设置当前 shell 的自动补全,要先安装 bash-completion 包。
    echo "source <(kubectl completion bash)" >> ~/.bashrc # 在您的 bash shell 中永久的添加自动补全
  • 您还可以为 kubectl 使用一个速记别名,该别名也可以与 completion 一起使用:

    1
    2
    alias k=kubectl
    complete -F __start_kubectl k
  • ZSH

    1
    2
    source <(kubectl completion zsh)  # 在 zsh 中设置当前 shell 的自动补全
    echo "if [ $commands[kubectl] ]; then source <(kubectl completion zsh); fi" >> ~/.zshrc # 在您的 zsh shell 中永久的添加自动补全

2、Kubectl 上下文和配置

  • 设置 kubectl 与哪个 Kubernetes 集群进行通信并修改配置信息
    1
    2
    3
    4
    5
    6
    7
    8
    9
    10
    11
    12
    13
    14
    15
    16
    17
    18
    19
    20
    21
    22
    23
    24
    25
    kubectl config view # 显示合并的 kubeconfig 配置。

    # 同时使用多个 kubeconfig 文件并查看合并的配置
    KUBECONFIG=~/.kube/config:~/.kube/kubconfig2 kubectl config view

    # 获取 e2e 用户的密码
    kubectl config view -o jsonpath='{.users[?(@.name == "e2e")].user.password}'

    kubectl config view -o jsonpath='{.users[].name}' # 显示第一个用户
    kubectl config view -o jsonpath='{.users[*].name}' # 获取用户列表
    kubectl config get-contexts # 显示上下文列表
    kubectl config current-context # 展示当前所处的上下文
    kubectl config use-context my-cluster-name # 设置默认的上下文为 my-cluster-name

    # 添加新的集群配置到 kubeconf 中,使用 basic auth 进行身份认证
    kubectl config set-credentials kubeuser/foo.kubernetes.com --username=kubeuser --password=kubepassword

    # 在指定上下文中持久性地保存名字空间,供所有后续 kubectl 命令使用
    kubectl config set-context --current --namespace=ggckad-s2

    # 使用特定的用户名和名字空间设置上下文
    kubectl config set-context gce --user=cluster-admin --namespace=foo \
    && kubectl config use-context gce

    kubectl config unset users.foo # 删除用户 foo

3、Apply

apply 通过定义 Kubernetes 资源的文件来管理应用。它通过运行 kubectl apply 在集群中创建和更新资源。 这是在生产中管理 Kubernetes 应用的推荐方法。 参见Kubectl 文档

4、创建对象

  • Kubernetes 配置可以用 YAML 或 JSON 定义。可以使用的文件扩展名有 .yaml、.yml 和 .json。
    1
    2
    3
    4
    5
    6
    7
    8
    9
    10
    11
    12
    13
    14
    15
    16
    17
    18
    19
    20
    21
    22
    23
    24
    25
    26
    27
    28
    29
    30
    31
    32
    33
    34
    35
    36
    37
    38
    39
    40
    41
    42
    43
    44
    45
    kubectl apply -f ./my-manifest.yaml           # 创建资源
    kubectl apply -f ./my1.yaml -f ./my2.yaml # 使用多个文件创建
    kubectl apply -f ./dir # 基于目录下的所有清单文件创建资源
    kubectl apply -f https://git.io/vPieo # 从 URL 中创建资源
    kubectl create deployment nginx --image=nginx # 启动单实例 nginx
    kubectl explain pods,svc # 获取 pod 清单的文档说明

    # 从标准输入创建多个 YAML 对象
    cat <<EOF | kubectl apply -f -
    apiVersion: v1
    kind: Pod
    metadata:
    name: busybox-sleep
    spec:
    containers:
    - name: busybox
    image: busybox
    args:
    - sleep
    - "1000000"
    ---
    apiVersion: v1
    kind: Pod
    metadata:
    name: busybox-sleep-less
    spec:
    containers:
    - name: busybox
    image: busybox
    args:
    - sleep
    - "1000"
    EOF

    # 创建有多个 key 的 Secret
    cat <<EOF | kubectl apply -f -
    apiVersion: v1
    kind: Secret
    metadata:
    name: mysecret
    type: Opaque
    data:
    password: $(echo -n "s33msi4" | base64 -w0)
    username: $(echo -n "jane" | base64 -w0)
    EOF

5、查看和查找资源

1
2
3
4
5
6
7
8
9
10
11
12
13
14
15
16
17
18
19
20
21
22
23
24
25
26
27
28
29
30
31
32
33
34
35
36
37
38
39
40
41
42
43
44
45
46
47
48
49
50
51
52
53
54
55
56
57
58
# get 命令的基本输出
kubectl get services # 列出当前命名空间下的所有 services
kubectl get pods --all-namespaces # 列出所有命名空间下的全部的 Pods
kubectl get pods -o wide # 列出当前命名空间下的全部 Pods,并显示更详细的信息
kubectl get deployment my-dep # 列出某个特定的 Deployment
kubectl get pods # 列出当前命名空间下的全部 Pods
kubectl get pod my-pod -o yaml # 获取一个 pod 的 YAML

# describe 命令的详细输出
kubectl describe nodes my-node
kubectl describe pods my-pod

# 列出当前名字空间下所有 Services,按名称排序
kubectl get services --sort-by=.metadata.name

# 列出 Pods,按重启次数排序
kubectl get pods --sort-by='.status.containerStatuses[0].restartCount'

# 列举所有 PV 持久卷,按容量排序
kubectl get pv --sort-by=.spec.capacity.storage

# 获取包含 app=cassandra 标签的所有 Pods 的 version 标签
kubectl get pods --selector=app=cassandra -o \
jsonpath='{.items[*].metadata.labels.version}'

# 获取所有工作节点(使用选择器以排除标签名称为 'node-role.kubernetes.io/master' 的结果)
kubectl get node --selector='!node-role.kubernetes.io/master'

# 获取当前命名空间中正在运行的 Pods
kubectl get pods --field-selector=status.phase=Running

# 获取全部节点的 ExternalIP 地址
kubectl get nodes -o jsonpath='{.items[*].status.addresses[?(@.type=="ExternalIP")].address}'

# 列出属于某个特定 RC 的 Pods 的名称
# 在转换对于 jsonpath 过于复杂的场合,"jq" 命令很有用;可以在 https://stedolan.github.io/jq/ 找到它。
sel=${$(kubectl get rc my-rc --output=json | jq -j '.spec.selector | to_entries | .[] | "\(.key)=\(.value),"')%?}
echo $(kubectl get pods --selector=$sel --output=jsonpath={.items..metadata.name})

# 显示所有 Pods 的标签(或任何其他支持标签的 Kubernetes 对象)
kubectl get pods --show-labels

# 检查哪些节点处于就绪状态
JSONPATH='{range .items[*]}{@.metadata.name}:{range @.status.conditions[*]}{@.type}={@.status};{end}{end}' \
&& kubectl get nodes -o jsonpath="$JSONPATH" | grep "Ready=True"

# 列出被一个 Pod 使用的全部 Secret
kubectl get pods -o json | jq '.items[].spec.containers[].env[]?.valueFrom.secretKeyRef.name' | grep -v null | sort | uniq

# 列举所有 Pods 中初始化容器的容器 ID(containerID)
# Helpful when cleaning up stopped containers, while avoiding removal of initContainers.
kubectl get pods --all-namespaces -o jsonpath='{range .items[*].status.initContainerStatuses[*]}{.containerID}{"\n"}{end}' | cut -d/ -f3

# 列出事件(Events),按时间戳排序
kubectl get events --sort-by=.metadata.creationTimestamp

# 比较当前的集群状态和假定某清单被应用之后的集群状态
kubectl diff -f ./my-manifest.yaml

6、更新资源

1
2
3
4
5
6
7
8
9
10
11
12
13
14
15
16
17
18
19
20
21
kubectl set image deployment/frontend www=image:v2               # 滚动更新 "frontend" Deployment 的 "www" 容器镜像
kubectl rollout history deployment/frontend # 检查 Deployment 的历史记录,包括版本
kubectl rollout undo deployment/frontend # 回滚到上次部署版本
kubectl rollout undo deployment/frontend --to-revision=2 # 回滚到特定部署版本
kubectl rollout status -w deployment/frontend # 监视 "frontend" Deployment 的滚动升级状态直到完成
kubectl rollout restart deployment/frontend # 轮替重启 "frontend" Deployment

cat pod.json | kubectl replace -f - # 通过传入到标准输入的 JSON 来替换 Pod

# 强制替换,删除后重建资源。会导致服务不可用。
kubectl replace --force -f ./pod.json

# 为多副本的 nginx 创建服务,使用 80 端口提供服务,连接到容器的 8000 端口。
kubectl expose rc nginx --port=80 --target-port=8000

# 将某单容器 Pod 的镜像版本(标签)更新到 v4
kubectl get pod mypod -o yaml | sed 's/\(image: myimage\):.*$/\1:v4/' | kubectl replace -f -

kubectl label pods my-pod new-label=awesome # 添加标签
kubectl annotate pods my-pod icon-url=http://goo.gl/XXBTWq # 添加注解
kubectl autoscale deployment foo --min=2 --max=10 # 对 "foo" Deployment 自动伸缩容

7、部分更新资源

1
2
3
4
5
6
7
8
9
10
11
12
13
14
# 部分更新某节点
kubectl patch node k8s-node-1 -p '{"spec":{"unschedulable":true}}'

# 更新容器的镜像;spec.containers[*].name 是必须的。因为它是一个合并性质的主键。
kubectl patch pod valid-pod -p '{"spec":{"containers":[{"name":"kubernetes-serve-hostname","image":"new image"}]}}'

# 使用带位置数组的 JSON patch 更新容器的镜像
kubectl patch pod valid-pod --type='json' -p='[{"op": "replace", "path": "/spec/containers/0/image", "value":"new image"}]'

# 使用带位置数组的 JSON patch 禁用某 Deployment 的 livenessProbe
kubectl patch deployment valid-deployment --type json -p='[{"op": "remove", "path": "/spec/template/spec/containers/0/livenessProbe"}]'

# 在带位置数组中添加元素
kubectl patch sa default --type='json' -p='[{"op": "add", "path": "/secrets/1", "value": {"name": "whatever" } }]'

8、编辑资源

  • 使用你偏爱的编辑器编辑 API 资源。
    1
    2
    kubectl edit svc/docker-registry                      # 编辑名为 docker-registry 的服务
    KUBE_EDITOR="nano" kubectl edit svc/docker-registry # 使用其他编辑器

9、对资源进行伸缩

1
2
3
4
kubectl scale --replicas=3 rs/foo                                 # 将名为 'foo' 的副本集伸缩到 3 副本
kubectl scale --replicas=3 -f foo.yaml # 将在 "foo.yaml" 中的特定资源伸缩到 3 个副本
kubectl scale --current-replicas=2 --replicas=3 deployment/mysql # 如果名为 mysql 的 Deployment 的副本当前是 2,那么将它伸缩到 3
kubectl scale --replicas=5 rc/foo rc/bar rc/baz # 伸缩多个副本控制器

10、删除资源

1
2
3
4
5
6
7
kubectl delete -f ./pod.json                                              # 删除在 pod.json 中指定的类型和名称的 Pod
kubectl delete pod,service baz foo # 删除名称为 "baz" 和 "foo" 的 Pod 和服务
kubectl delete pods,services -l name=myLabel # 删除包含 name=myLabel 标签的 pods 和服务
kubectl delete pods,services -l name=myLabel --include-uninitialized # 删除包含 label name=myLabel 标签的 Pods 和服务
kubectl -n my-ns delete po,svc --all # 删除在 my-ns 名字空间中全部的 Pods 和服务
# 删除所有与 pattern1 或 pattern2 awk 模式匹配的 Pods
kubectl get pods -n mynamespace --no-headers=true | awk '/pattern1|pattern2/{print $1}' | xargs kubectl delete -n mynamespace pod

11、与运行中的 Pods 进行交互

1
2
3
4
5
6
7
8
9
10
11
12
13
14
15
16
17
18
19
kubectl logs my-pod                                 # 获取 pod 日志(标准输出)
kubectl logs -l name=myLabel # 获取含 name=myLabel 标签的 Pods 的日志(标准输出)
kubectl logs my-pod --previous # 获取上个容器实例的 pod 日志(标准输出)
kubectl logs my-pod -c my-container # 获取 Pod 容器的日志(标准输出, 多容器场景)
kubectl logs -l name=myLabel -c my-container # 获取含 name=myLabel 标签的 Pod 容器日志(标准输出, 多容器场景)
kubectl logs my-pod -c my-container --previous # 获取 Pod 中某容器的上个实例的日志(标准输出, 多容器场景)
kubectl logs -f my-pod # 流式输出 Pod 的日志(标准输出)
kubectl logs -f my-pod -c my-container # 流式输出 Pod 容器的日志(标准输出, 多容器场景)
kubectl logs -f -l name=myLabel --all-containers # 流式输出含 name=myLabel 标签的 Pod 的所有日志(标准输出)
kubectl run -i --tty busybox --image=busybox -- sh # 以交互式 Shell 运行 Pod
kubectl run nginx --image=nginx -n mynamespace # 在指定名字空间中运行 nginx Pod
kubectl run nginx --image=nginx # 运行 ngins Pod 并将其规约写入到名为 pod.yaml 的文件
--dry-run=client -o yaml > pod.yaml

kubectl attach my-pod -i # 挂接到一个运行的容器中
kubectl port-forward my-pod 5000:6000 # 在本地计算机上侦听端口 5000 并转发到 my-pod 上的端口 6000
kubectl exec my-pod -- ls / # 在已有的 Pod 中运行命令(单容器场景)
kubectl exec my-pod -c my-container -- ls / # 在已有的 Pod 中运行命令(多容器场景)
kubectl top pod POD_NAME --containers # 显示给定 Pod 和其中容器的监控数据

12、与节点和集群进行交互

1
2
3
4
5
6
7
8
9
10
kubectl cordon my-node                                                # 标记 my-node 节点为不可调度
kubectl drain my-node # 对 my-node 节点进行清空操作,为节点维护做准备
kubectl uncordon my-node # 标记 my-node 节点为可以调度
kubectl top node my-node # 显示给定节点的度量值
kubectl cluster-info # 显示主控节点和服务的地址
kubectl cluster-info dump # 将当前集群状态转储到标准输出
kubectl cluster-info dump --output-directory=/path/to/cluster-state # 将当前集群状态输出到 /path/to/cluster-state

# 如果已存在具有指定键和效果的污点,则替换其值为指定值
kubectl taint nodes foo dedicated=special-user:NoSchedule

12.1、资源类型

  • 用于探索 API 资源的其他操作
    1
    2
    3
    4
    5
    6
    kubectl api-resources --namespaced=true      # 所有命名空间作用域的资源
    kubectl api-resources --namespaced=false # 所有非命名空间作用域的资源
    kubectl api-resources -o name # 用简单格式列举所有资源(仅显示资源名称)
    kubectl api-resources -o wide # 用扩展格式列举所有资源(又称 "wide" 格式)
    kubectl api-resources --verbs=list,get # 支持 "list" 和 "get" 请求动词的所有资源
    kubectl api-resources --api-group=extensions # "extensions" API 组中的所有资源

12.2、格式化输出

  • 要以特定格式将详细信息输出到终端窗口,可以将-o--output参数添加到支持的kubectl命令
    image_1eircal39tnp15mu1a0u1o6iun911.png-51.4kB

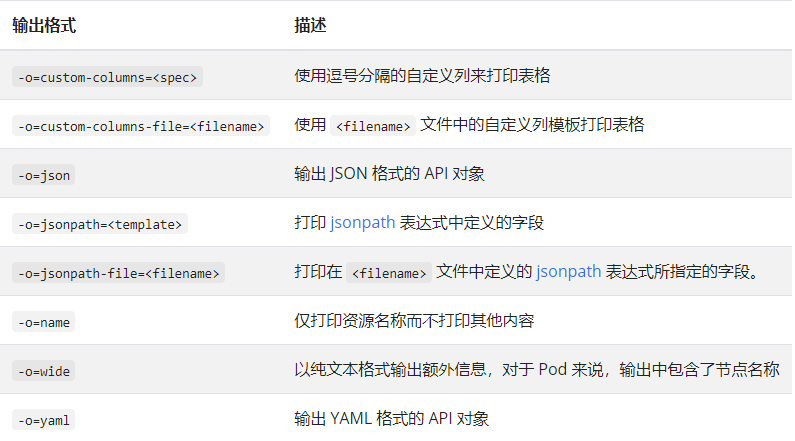
  • 使用 -o=custom-columns 的示例:

    1
    2
    3
    4
    5
    6
    # 集群中运行着的所有镜像
    kubectl get pods -A -o=custom-columns='DATA:spec.containers[*].image'
    # 除 "k8s.gcr.io/coredns:1.6.2" 之外的所有镜像
    kubectl get pods -A -o=custom-columns='DATA:spec.containers[?(@.image!="k8s.gcr.io/coredns:1.6.2")].image'
    # 输出 metadata 下面的所有字段,无论 Pod 名字为何
    kubectl get pods -A -o=custom-columns='DATA:metadata.*'

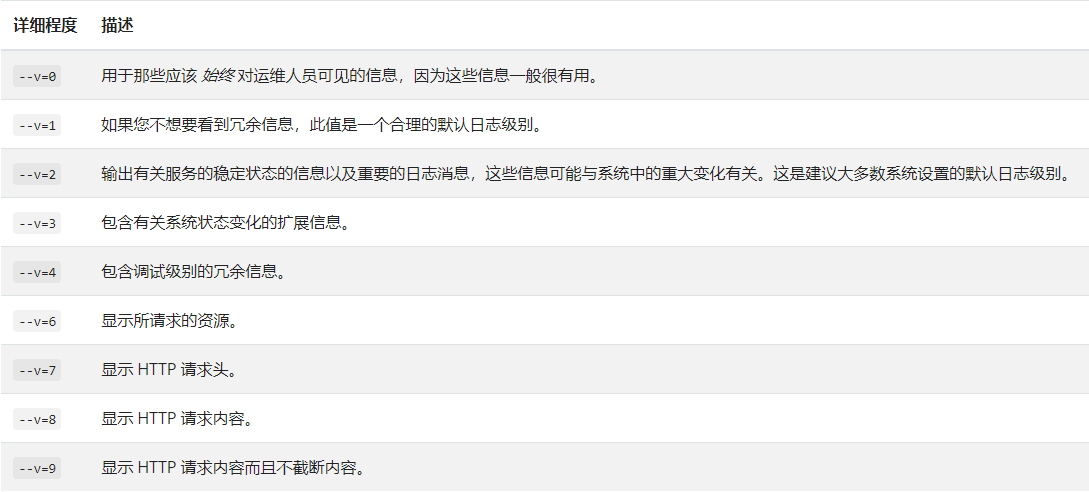
12.3、Kubectl 日志输出详细程度和调试

  • Kubectl 日志输出详细程度是通过 -v 或者 –v 来控制的,参数后跟一个数字表示日志的级别。 Kubernetes 通用的日志习惯和相关的日志级别在 这里 有相应的描述。
    image_1eircfbds18mj1fi01clp15ek1k5h1e.png-54.5kB

附录

-------------本文结束感谢您的阅读-------------
LiGuanCheng wechat
如有问题,请与我微信交流或通过右下角“daovoice”与我联系~。
请我喝一杯咖啡~